PfSense Wireguard Server Tutorial
PFsense Wireguard Server
Install Wireguard Package
Go to System → Package Manager → Available Packages.
Search for “Wireguard”
 At the time of making this, version 0.1.6_2 is the most up to date.
Tunnel Config
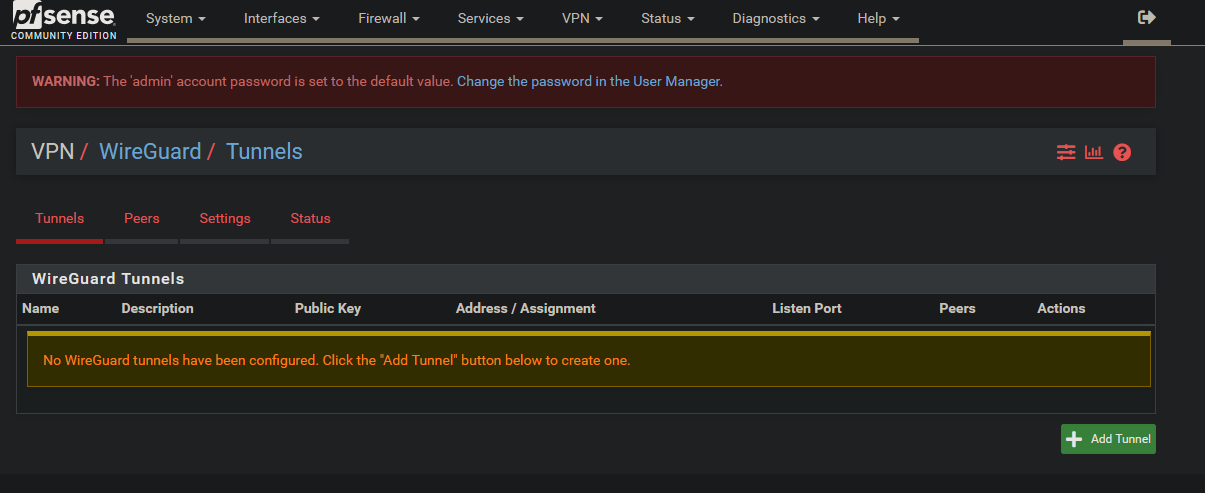
From the menu at the top, select VPN → Wireguard.
Select [+ Add Tunnel]
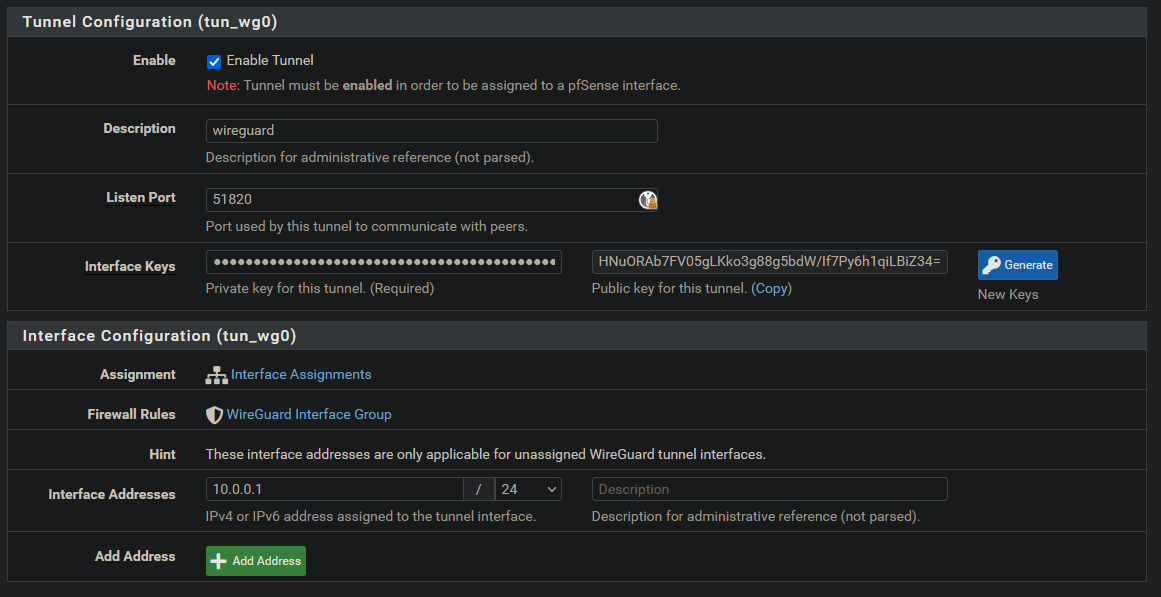
- Enable tunnel
- Set a description for the tunnel
- Set the port to anything. (Default is 51820)
- Click “Generate” to create your public and private keys.
- Create interface addresses.
Interface addresses can be any internal IP address range. Here I chose the 10.0.0.1/24 subnet.
Meaning I can use 10.0.0.2-10.0.0.255
See RCF1918.
Once finished, click save. Then go to Peers.
Peer Config
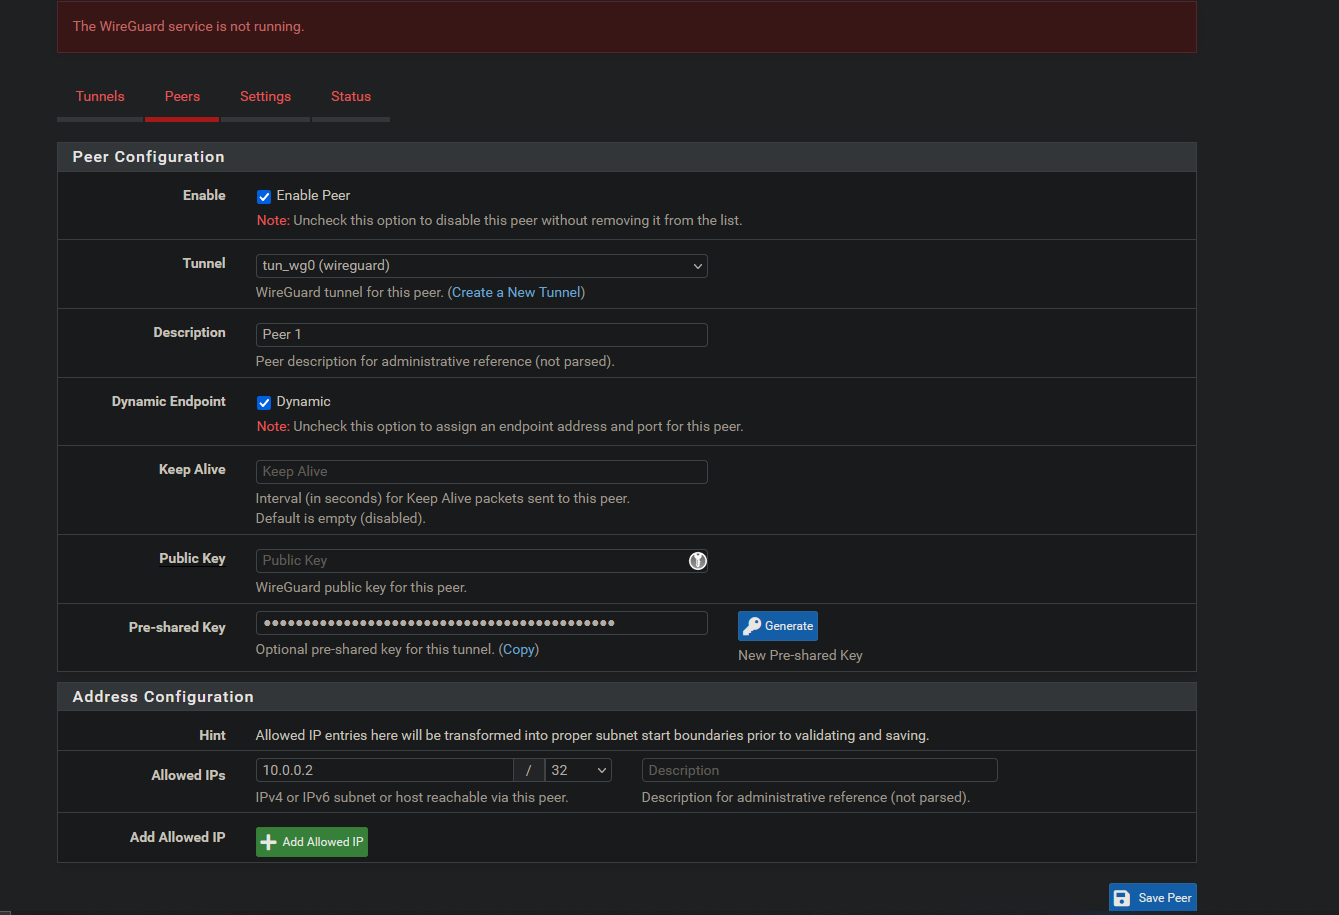
- Enable peer.
- Select the tunnel you created (in this case tun_wg0).
- Set a Description.
- Keep the endpoint dynamic.
- Keep Alive: leave blank.
- Public Key* this will be generate from your app.
- Pre-Shared Key (optional but can provide quantum protection) Click [Generate] to create one.
- Allowed IP’s: Set this to an address that has not been used in your subnet yet. Ex: 10.0.0.2/32 (means only 10.0.0.2)
App Config: Android
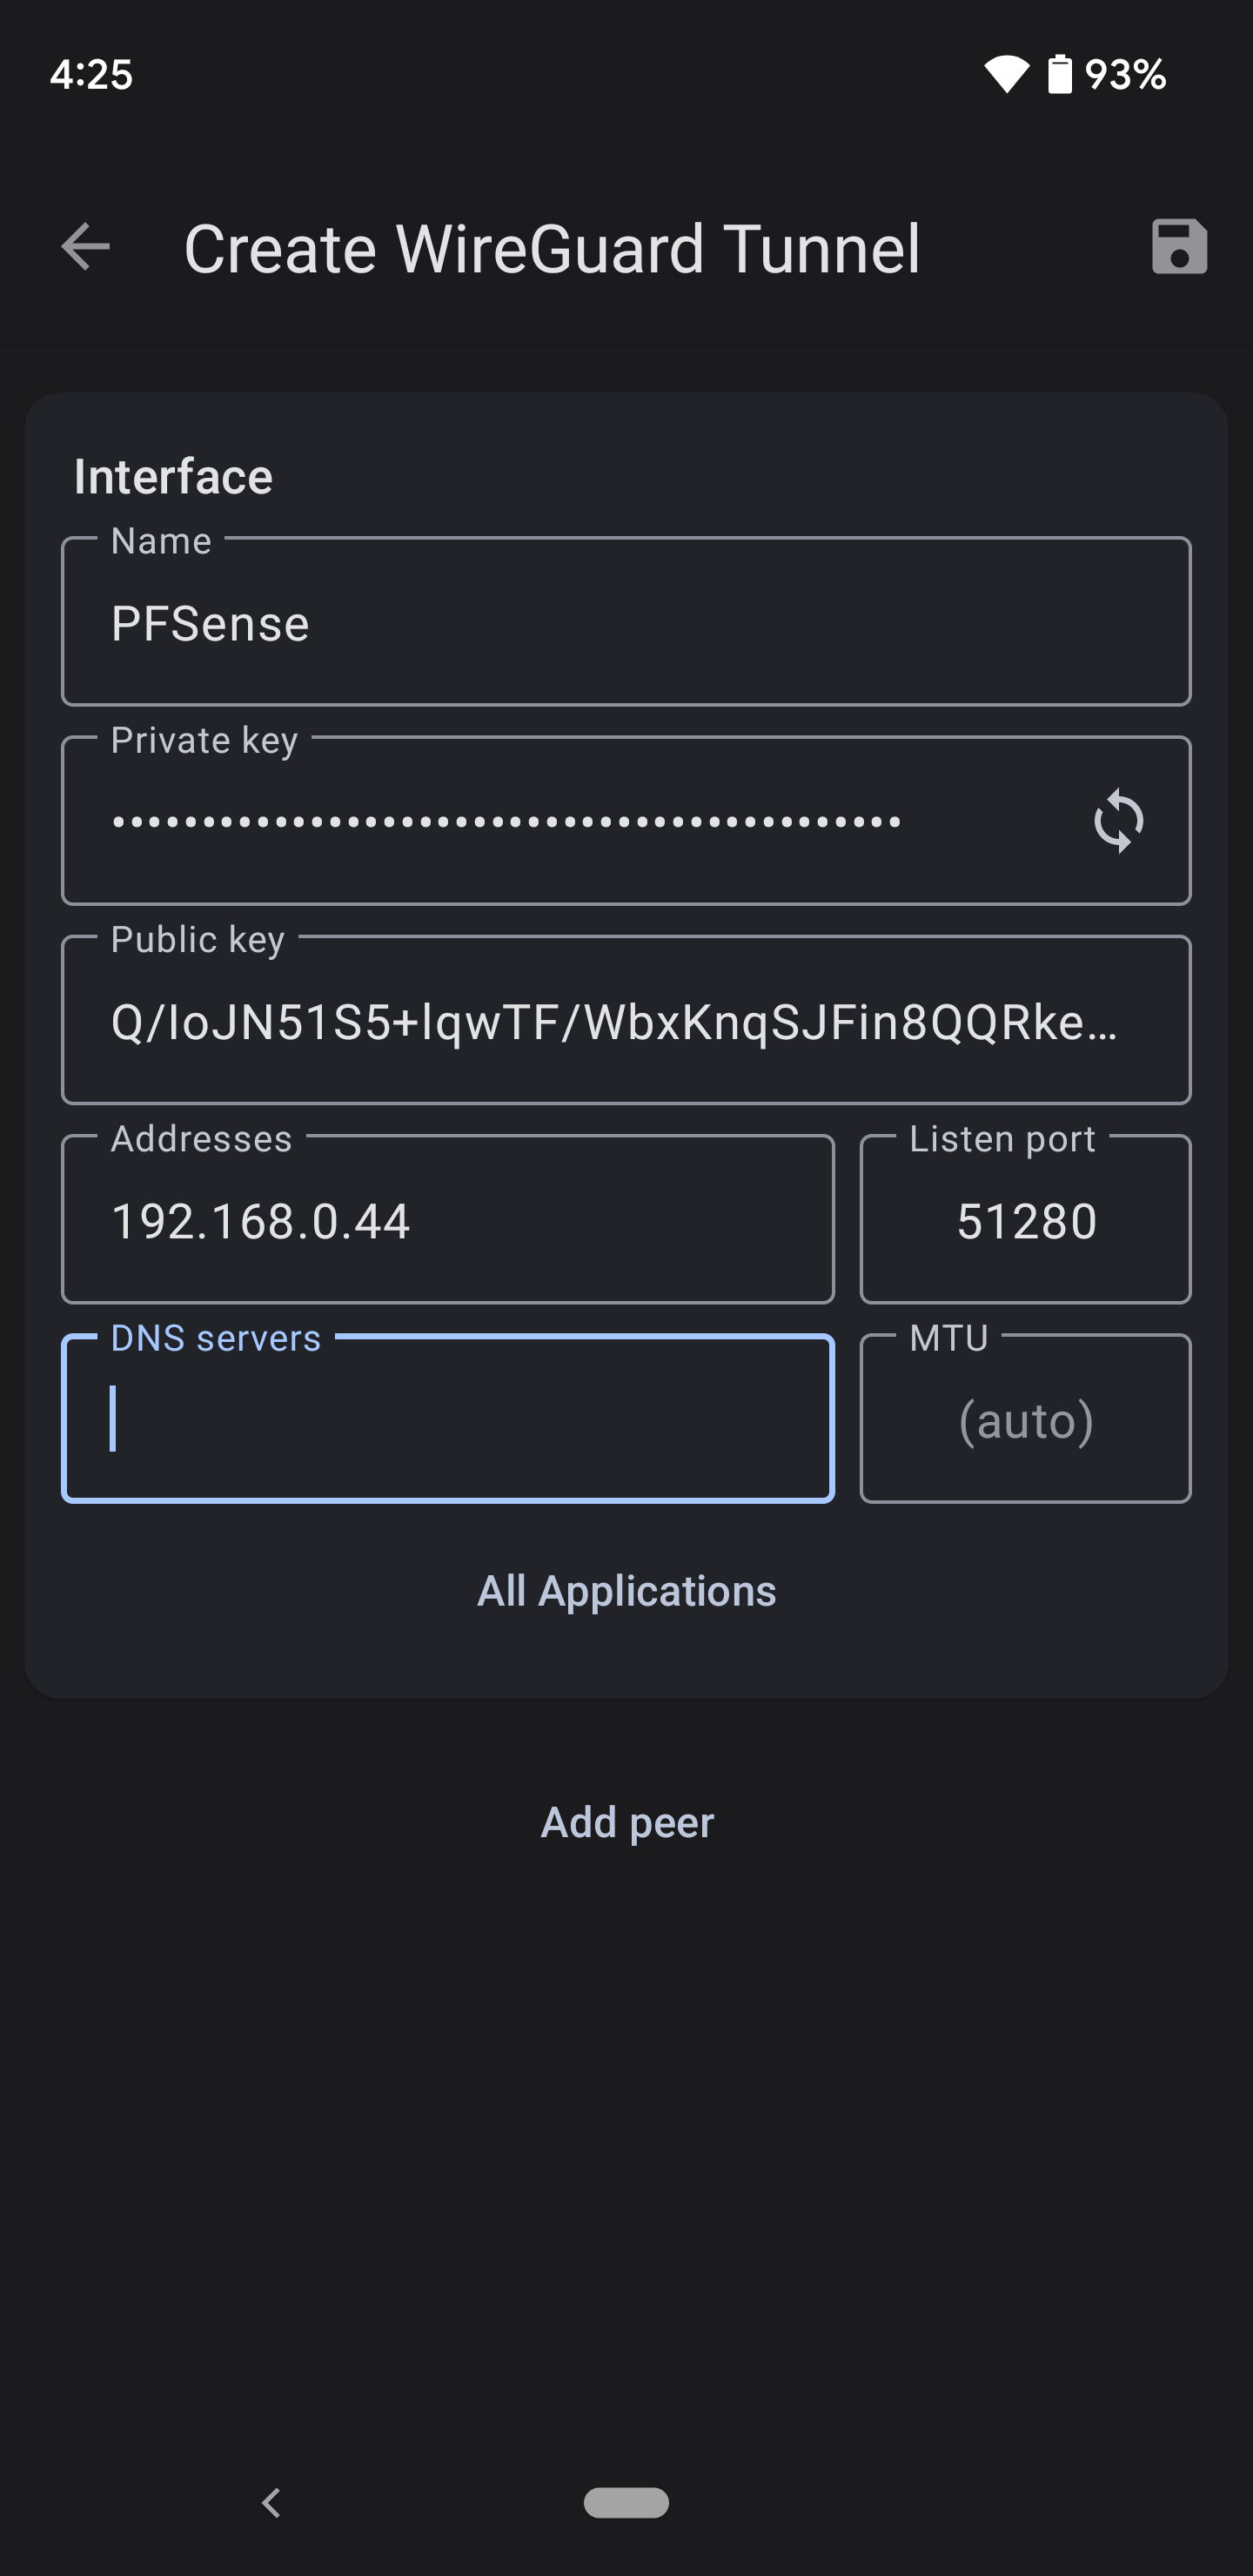
- Interface Name: Pfsense or any name you prefer 2 Click the refresh icon in the Private Key section to generate a public and private key.
- The addresses should be the address you gave to the peer. In this case it is 10.0.0.2/32.
- DNS Servers: You can set the DNS server to the upstream DNS on your network (usually 192.168.0.1 or 10.0.0.1) if you created a DNS for the tun0 interface, or leave this blank.
- MTU leave empty.
- Copy the Public Key and paste it into the Public Key section for the Peer on the server. See Slide 7, #6.
Then select “Add Peer” at the bottom

- Public Key: Copy the public from the server. (Slide 6 #4)
- Pre-shared key: Copy the pre-shared key from the server. (Slide 7 #7)
- Persistent keepalive: Leave Blank
- Enpoint: This should be the public IP of your server. In my case my PFsense box is a VM on my local net so the IP is 192.168.0.44. Also :51820 is the port specification we configured.
- Allowed IPs: 0.0.0.0/0 means any IP address on IPv4 and ::/0 means any IP address on IPv6. Setting it up this way means we created a Full-Tunnel. All traffic on the device will be routed through the wireguard VPN.
Firewall Config
Select Firewall → Rules from the main menu.
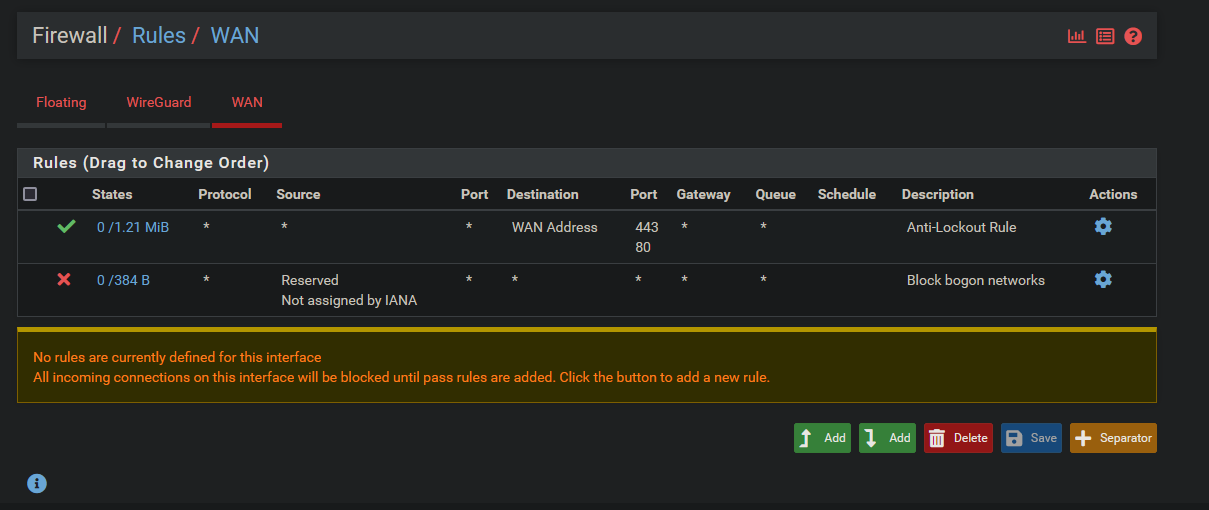 By default your WAN should only have 1 rule.
Block bogon networks.
Mine has an additional rule since I do not have a LAN address on this VM. Ignore this rule.
Select “Add \/”
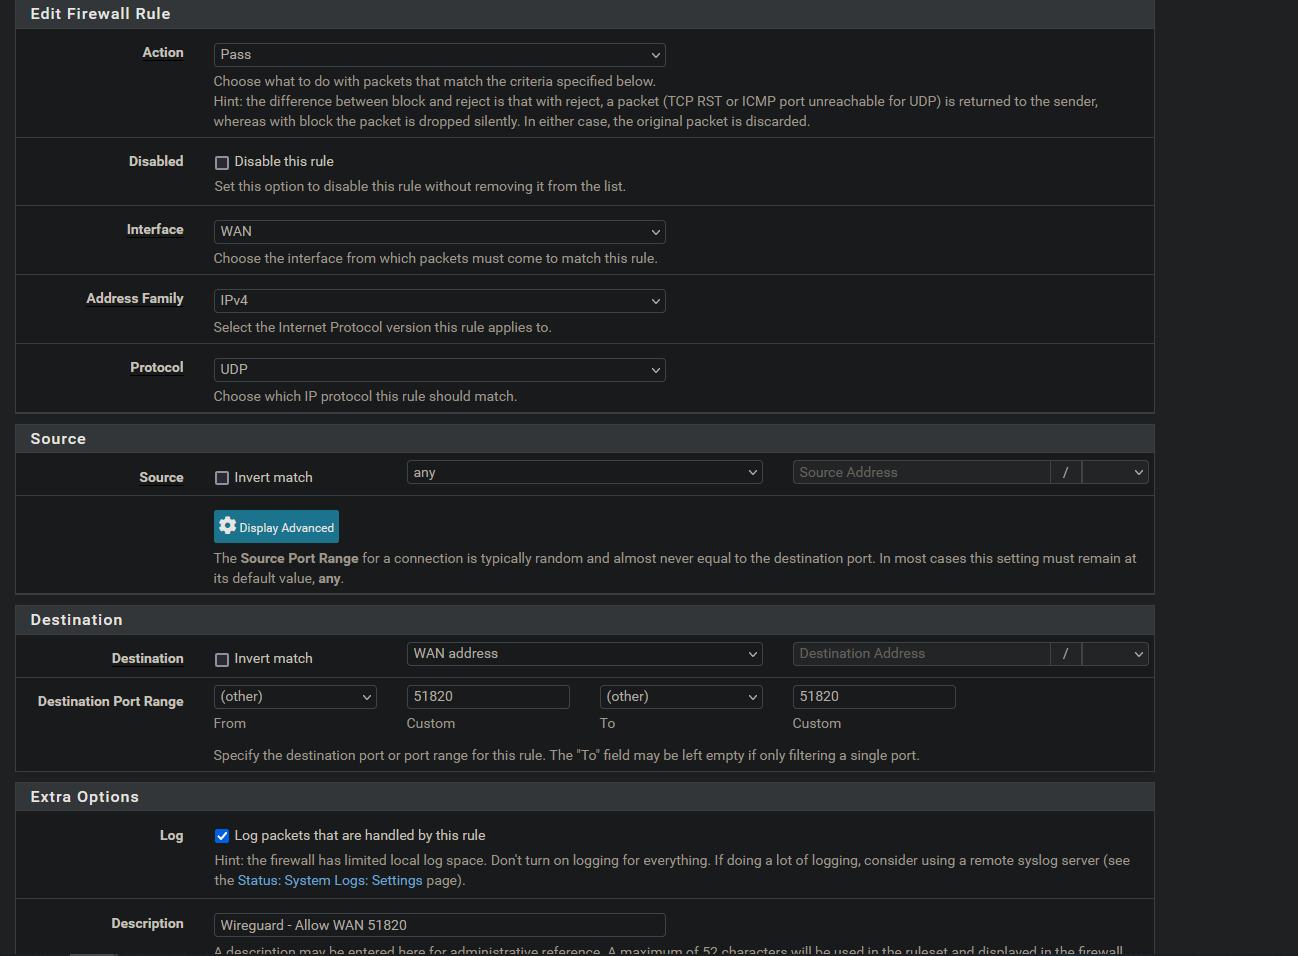
- Action: Pass
- Interface: WAN
- Address Family: IPv4
- Protocol: UDP
- Source: any
- Destination: WAN address
- Destination Port Range: Custom: 51820 to Custom: 51820 8: Log Packets: Optional (can create a lot of spam)
- Description: Wireguard – Allow WAN 51820
Then click Save. You may have to click appy changes after you save.
Wireguard Firewall
By default there are no rules to allow Wireguard traffic anywhere. We need to create 1 rule to allow all traffic. But be warned, this tutorial does not cover how to properly segment your network and add additional security to your wireguard interface. VLANs, proper firewall rules, and network segmentation is important.
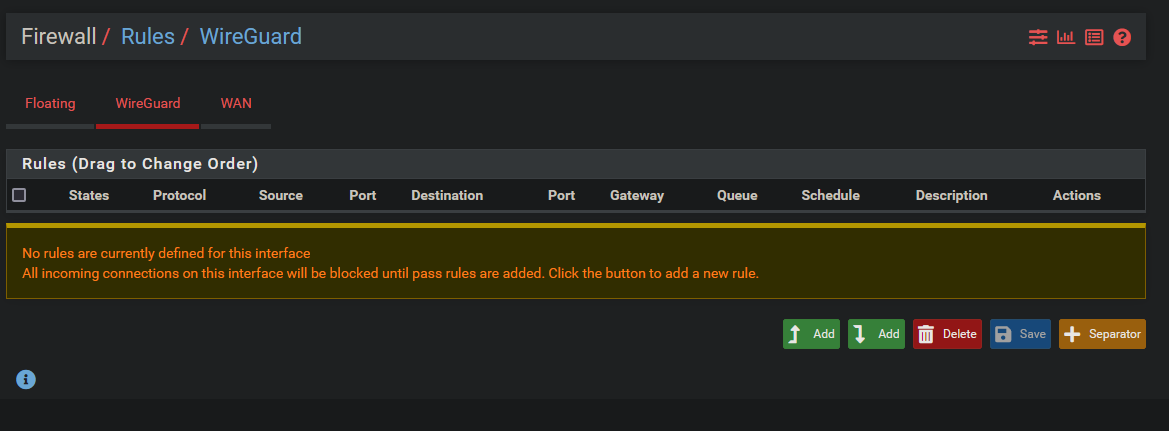
Select Add to create a new rule
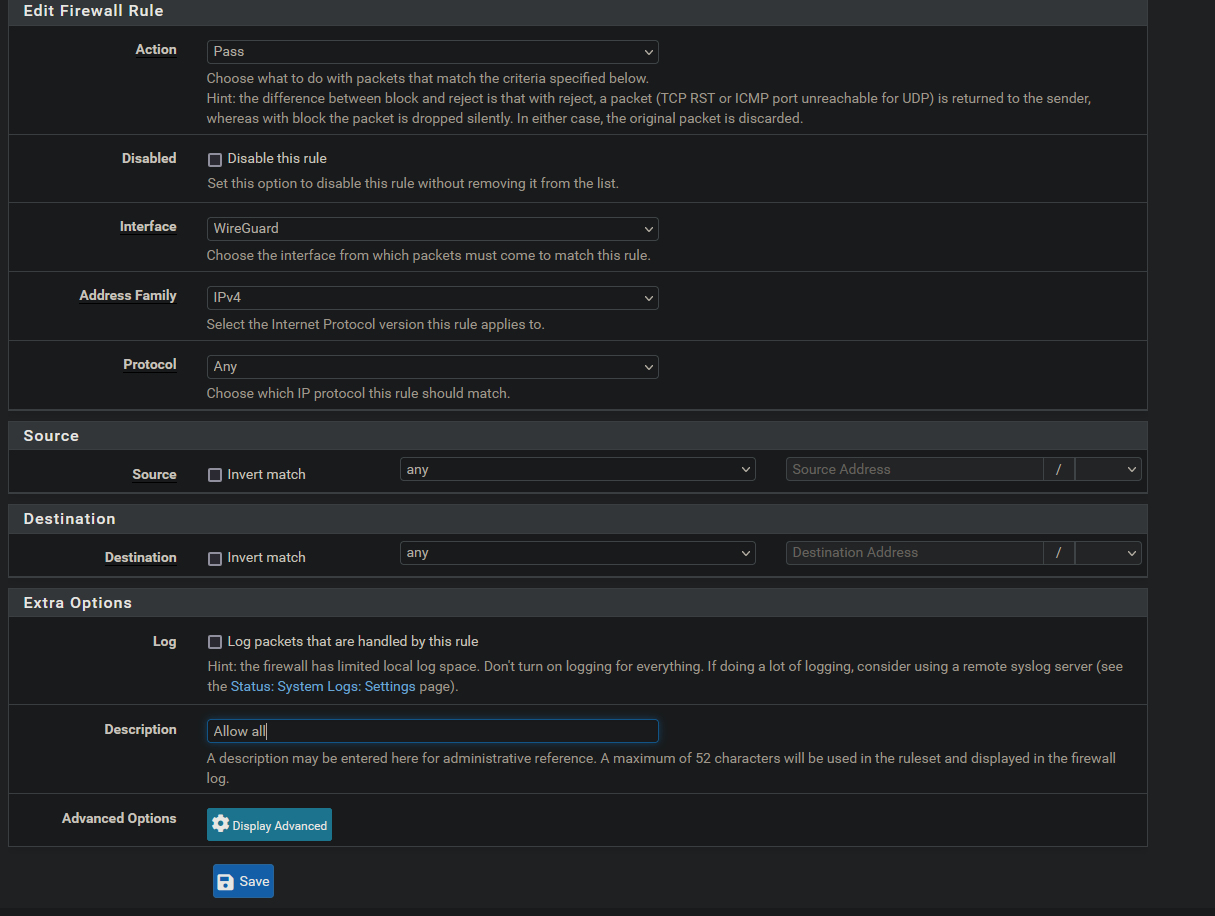
- Action: Pass
- Interface: Wireguard
- Address Family: IPv4
- Protocol: Any
- Source: Any
- Destination: Any
- Log: Optional
- Description: Allow all
- Save
Apply Changes after saving
NAT Rules
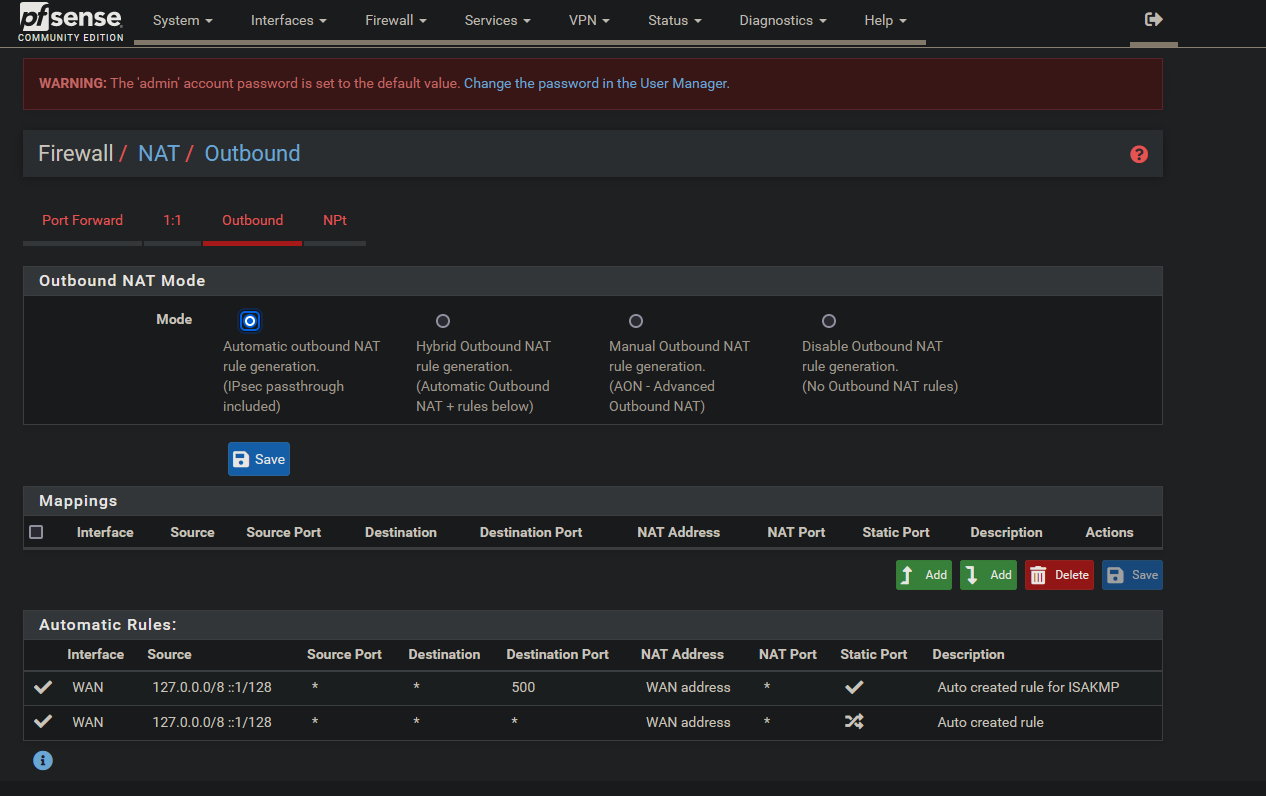
Select Firewall → NAT and then Outbound to arrive at this page.
In order to route Wireguard traffic back out the WAN we need to configure a few things in the NAT settings.
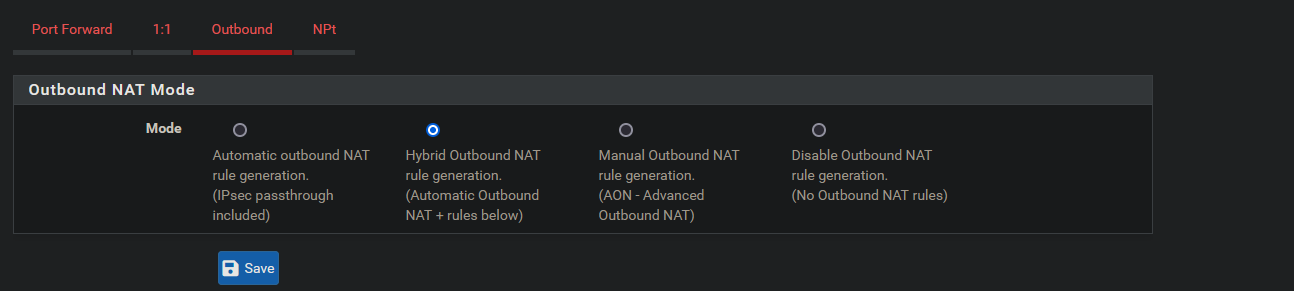
Set Outbound NAT Mode to Hybrid.
 Select “Add /\” under Mappings to create a new NAT Outbound Mapping.
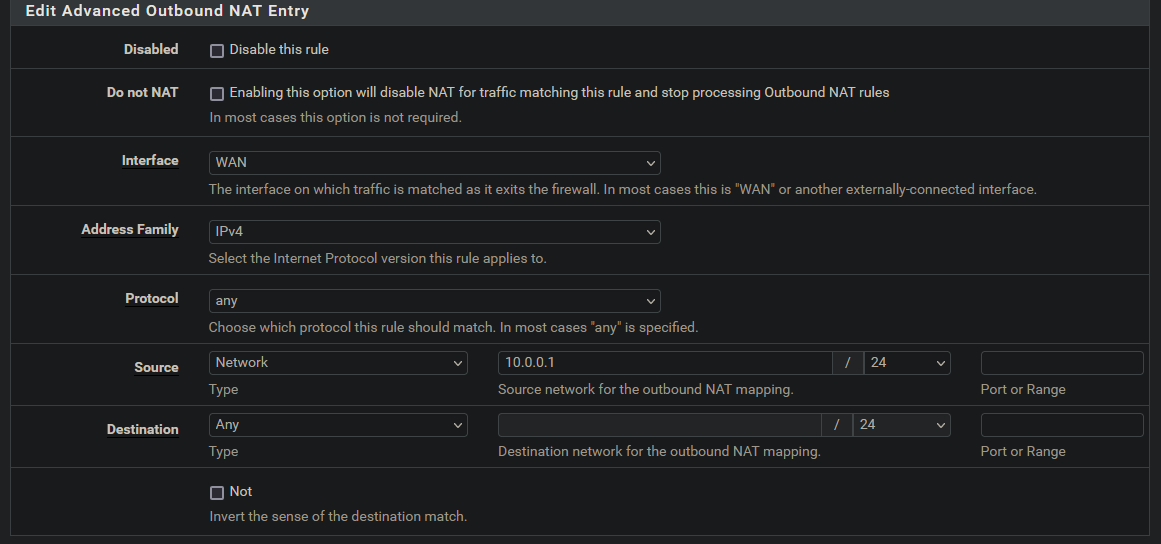
- Interface: WAN
- Address Family: IPv4
- Protocol: any
- Source: Network – 10.0.0.1/24
Then click save. You may need to apply the changes after clicking save.
Verify
 After saving and reloading the firewall go back to VPN → Wireguard → Status. Click the down arrow on the tun_wg0 tunnel. You should see that the peer you created has successfully been created.