Wireguard VPS Tutorial
VPS Wireguard Server
Update and Install Wireguard
First update and upgrade your system, then install wireugard
sudo apt update && sudo apt upgrade -y
sudo apt install wireguard
Key Generation
umask 077
wg genkey | tee privatekey | wg pubkey > publickey
This will generate base64-encoded public and private keys using the wg utility.
Enable Forwarding
sudo nano /etc/sysctl.conf
Open and edit the sysctl.conf
You’ll want to uncomment the line net.ipv4.ip_forward=1. Then save your changes and exit.
Type:
sudo sysctl -p
net.ipv4.ip_forward=1 -> Should print to the screen
Wireguard Configuration
First move the public and private keys to the /etc/wireguard directory.
You may need to become root.
Then create a file named wg0.conf and move it to the /etc/wireguard directory.
sudo mv publickey /etc/wireguard
sudo mv privatekey /etc/wireguard
touch wg0.conf
sudo mv wg0.conf /etc/wireguard
Private Key
Copy the value printed to the screen after running this command.
sudo cat /etc/wireguard/privatekey
Then open the wg0.conf file:
sudo nano /etc/wireguard/wg0.conf
wg0.conf
[Interface]
PrivateKey =
ListenPort = 51820
SaveConfig = true

[Peer]
PublicKey =
AllowedIps = 10.0.0.2/32
-
Paste the private key from the previous screen in the PrivateKey section.
- In your phone application generate a public/private key pair and copy the public key to place here.
- For each new Peer(phone) copy the config here. Change the PublicKey and update the AllowedIps to a different IP in the subnet range. Interface should not change
## NAT and UFW Configs for wg0.conf
PostUp = ufw route allow in on wg0 out on eth0
PostUp = iptables -t nat -I POSTROUTING -o eth0 -j MASQUERADE
PostUp = ip6tables -t nat -I POSTROUTING -o eth0 -j MASQUERADE
PreDown = ufw route delete allow in on wg0 out on eth0
PreDown = iptables -t nat -D POSTROUTING -o eth0 -j MASQUERADE
PreDown = ip6tables -t nat -D POSTROUTING -o eth0 -j MASQUERADE
iI the wg0.conf you will need to add these rules just above the [Peer] section. This will allow traffic through wg0 out your eth0 port. NOTE* your main interface may be named something else.
Run ip route list default to find out the name of your interface and replace eth0 with that main interface name.
Final wg0.conf:
[Interface]
PrivateKey = somePrivateKeyValuehere=
ListenPort = 51820
SaveConfig = true


PostUp = ufw route allow in on wg0 out on eth0
PostUp = iptables -t nat -I POSTROUTING -o eth0 -j MASQUERADE
PostUp = ip6tables -t nat -I POSTROUTING -o eth0 -j MASQUERADE
PreDown = ufw route delete allow in on wg0 out on eth0
PreDown = iptables -t nat -D POSTROUTING -o eth0 -j MASQUERADE
PreDown = ip6tables -t nat -D POSTROUTING -o eth0 -j MASQUERADE

[Peer]
PublicKey = somePublicKeyValueHere=
AllowedIps = 10.0.0.2/32
Firewall
There are a few firewall rules you will need to configure before you can connect to the server.
sudo ufw allow 51820/udp
sudo ufw allow OpenSSH
sudo ufw enable
Using ufw we allow udp traffic in on port 51820 for Wireguard.
Also we keep port 22 open for SSH connections. This is required to not lose connection to the server.
Then we enable the firewall.
Enable Wireguard
sudo systemctl enable wg-quick@wg0.service
This will enable to wireguard service to start at system boot
sudo systemctl start wg-quick@wg0.service
This will start the wireguard service. If there are any issues you can track them down with the following command:
sudo systemctl status wg-quick@wg0.service
Phone Config
In the wireguard app on Android create a new connection from scratch and populate the following values:
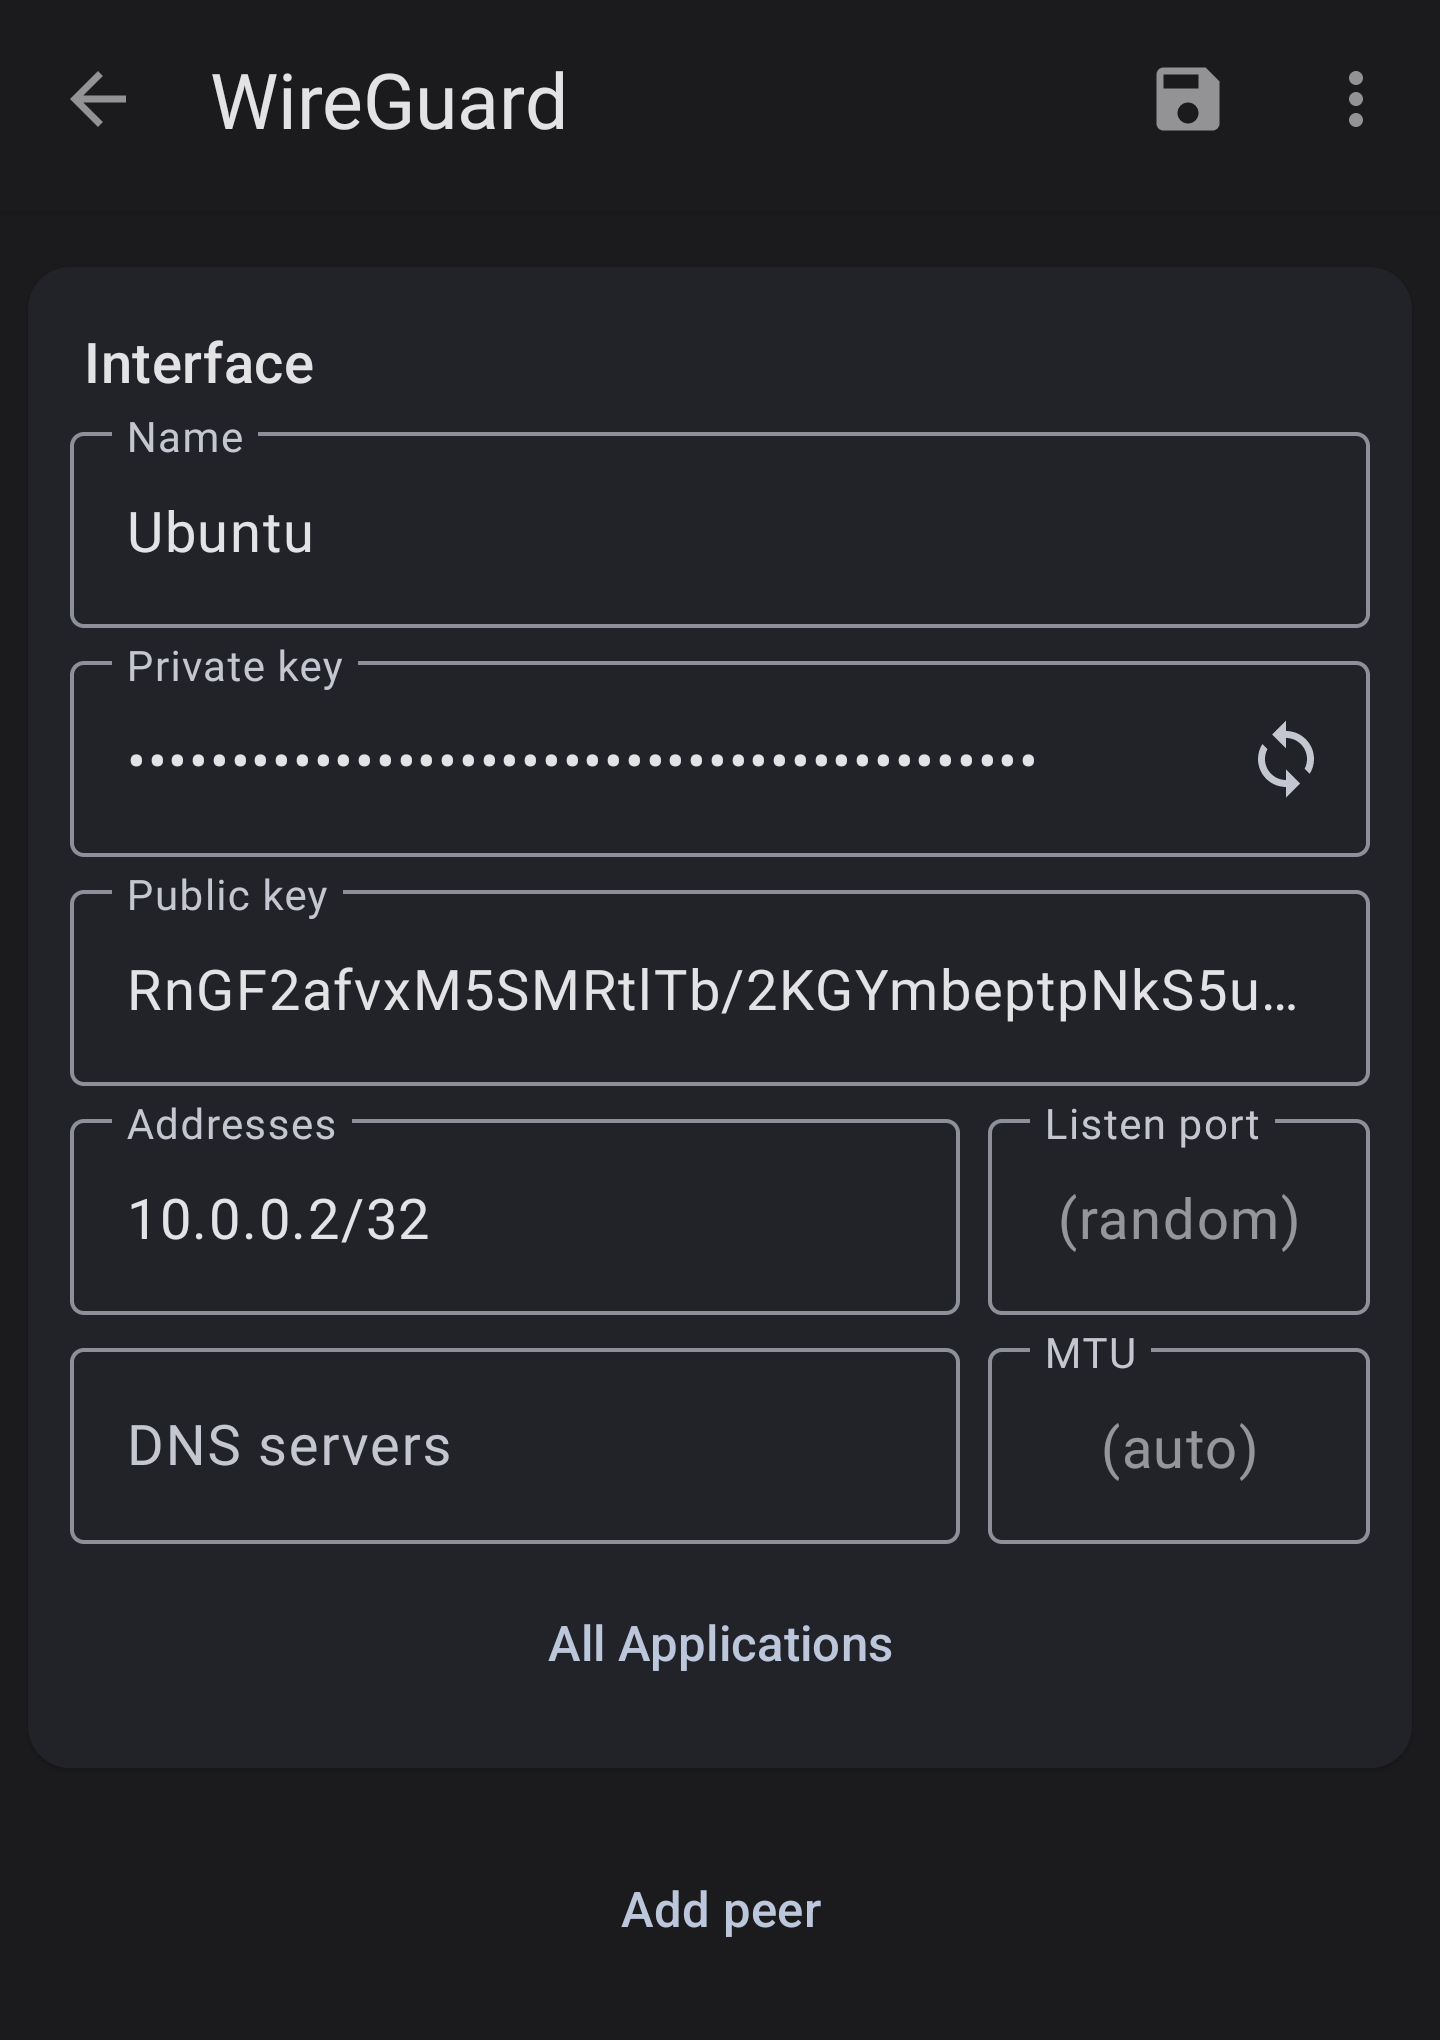
- Name Ubuntu
- Generate the private/public keys with the refresh icon.
- Addresses: Set to unique address within the subnet generated on the server. In this case its 10.0.0.2.
- Click Add Peer
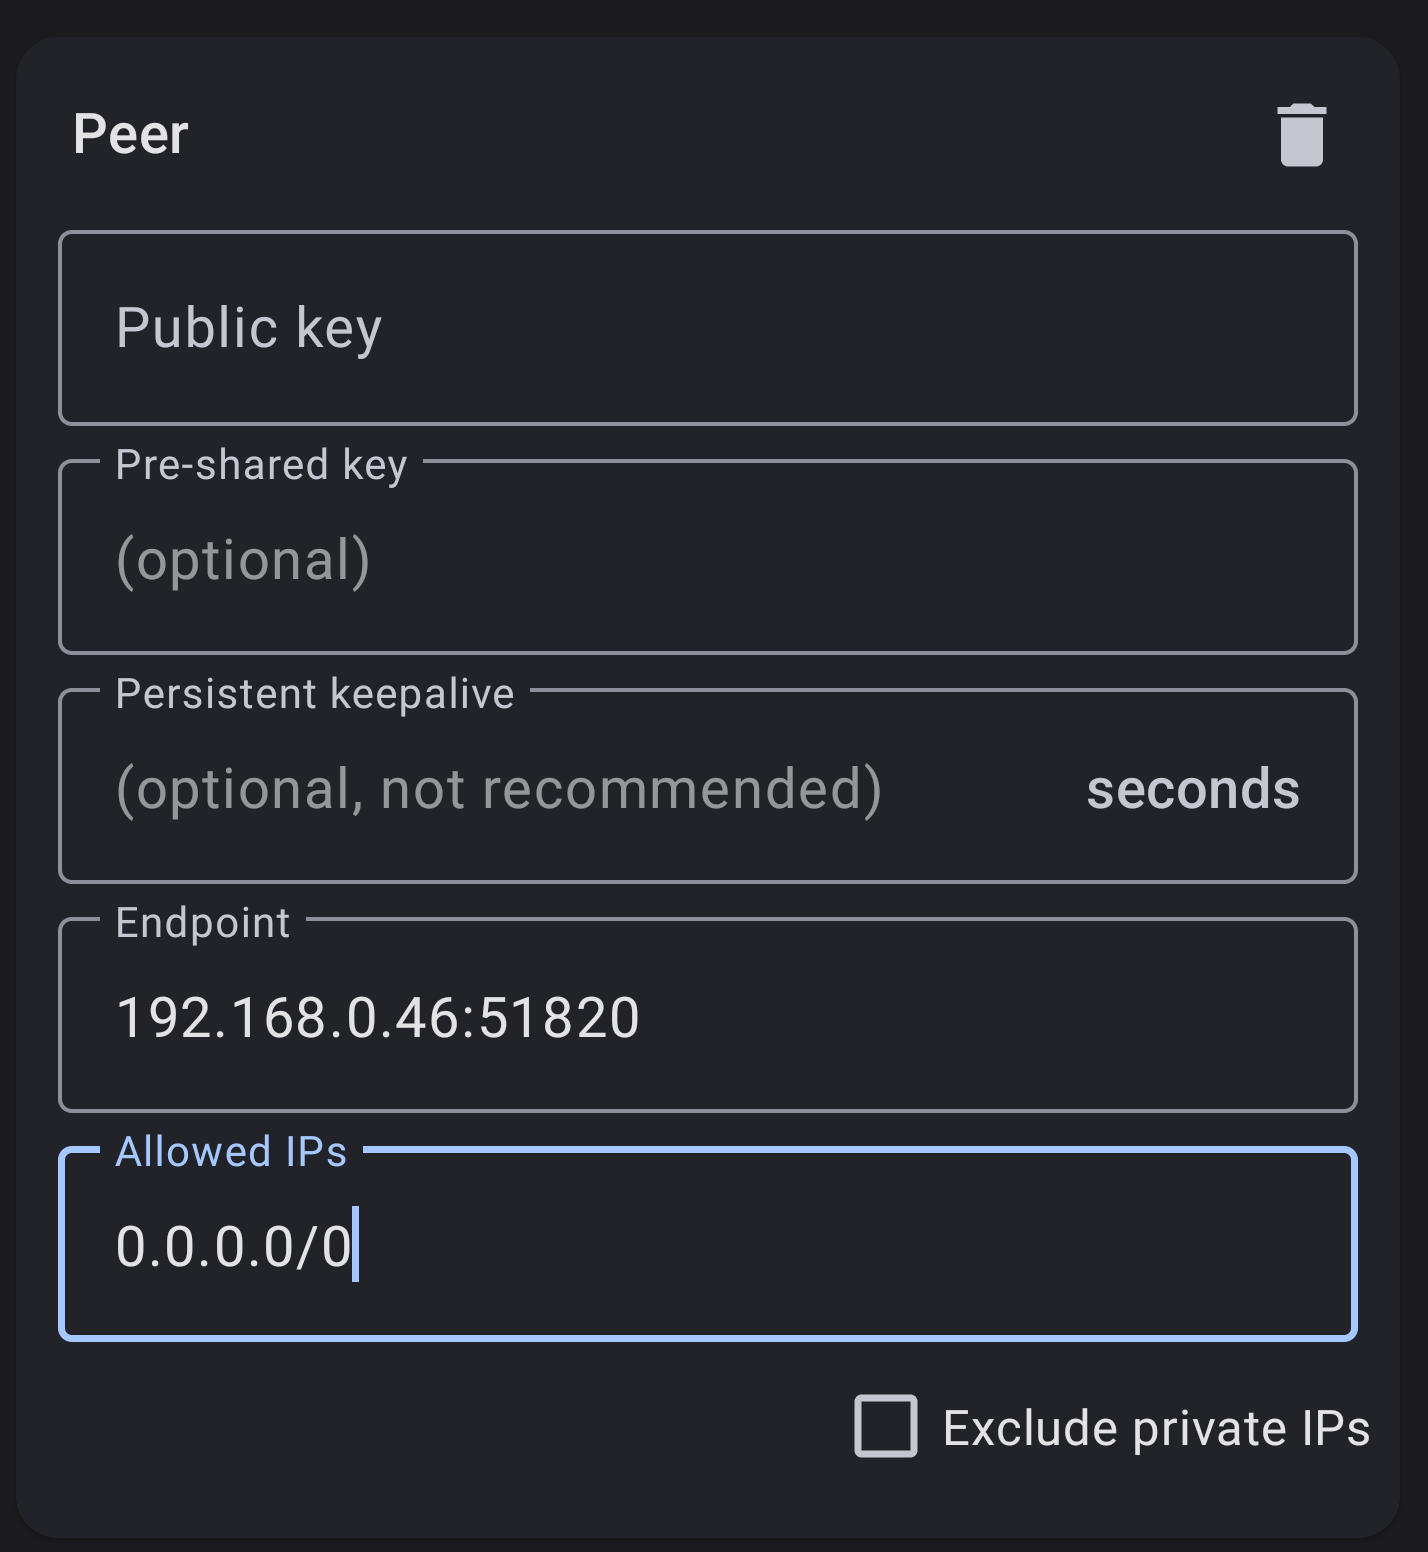
- The copy the Public Key from the server and paste it here where it says
Public Key. - Endpoint will be the
public IPof the server. In this case the VM is on my local network with the IP of192.168.0.46.:51820is the port specified. - Allowed IPS:
0.0.0.0/0, ::/0Allow all network traffic
Test the connection
After completing all the steps above you are ready to test the connection. Press the toggle button on the android application to start the connection to the wireguard server. Then check rx and tx to see if data is being sent and received from the server. Usually if the rx says 0 there are 2 common issues.
- The keys are incorrect
- There is a firewall rule blocking connections